Tuesday, May 3, 2011

Project # 13 Lacy Clay Ornament


This project was introduced by a PowerPoint that featured representations of different types of lace. After discussing the various types of lace, I was given a half sheet of construction paper to use to draw a design to be used as a template for my lace ornament. I chose a five-petal flower design inside two decorative rings. I used a black sharpie to outline the design I created on the construction paper. Next, I taped a piece of waxed paper over the design. I was given a small amount of clay in a small zip-locked baggie. I kneaded the clay until the water that had separated from the clay was reincorporated into the clay. I then worked the clay to one corner of the baggie and snipped the very tip of that corner being careful to keep the hole small reasoning that I could always make it bigger if I needed to, but I could not make it smaller. I forced the clay out of the small hole using the clay to trace the design onto the waxed paper. (It was sort of like decorating a cake with a tube of frosting). I was careful to keep the lines as uniform as possible and make them thick enough so that when the clay dried and the waxed paper was peeled off, the lines of the lace would be intact. After I finished my pattern with the clay, I painted it with water colors using the warm colors of yellow, orange, red and a shade of red made by mixing black with the red. After the clay dried, it was fairly easy to remove from the waxed paper. I then tied a piece of ribbon to it so that it could be hung.


A lacy clay ornament could be an extension activity in social studies as students study the role clay has played in past or present civilizations. If this study occurred near a holiday (such as Mother's Day or Christmas) the class could be encouraged to make them as gifts. Another social studies possibility might be connecting lace to the time in history when lace was very fashionable and incorporated in men's clothing as well as women's clothing. Children always seem to enjoy comparing the style of dress of earlier days to current fashion.

Project # 12 Stepping Stone


The stepping stone project used a photo as its focal point. I chose a photo of myself and my fiance because it had a special meaning for me. The photo was laminated before the project began. This project started with a plastic circular form in which a cement mixture was placed. The cement mixture filled the form to about 3/4 full. Before adding any of the decorative pieces, I shook the mixture to help the air bubbles to come to the top. I also used several paper towels to remove some of the water that came to the top of the cement mixture. With most of the standing water removed, I began by laying my picture in the middle. I was given a choice of colored stones, both smooth and rough, and other various objects like shells that I could use to decorate my stone. I chose to decorate the stone in a balanced fashion. Because the photo represented my relationship with someone very special, I chose colors of stones to represent important aspects of that relationship. The green stones represent the "grass"-finished-beef we raise; the blue stones represent the enormous obstacle of water that we both have had to overcome to develop our business; and the dark pink stones represent the love we share for one another.


Making stepping stones such as this one could be a classrom extension activity of a social studies class where students may be studying the longevity of structures typical to various civilizations; take for example cement interstate hiways vs. paved or gravel roads or cement buildings vs. wood frame buildings. Comparisons and contrasts can be drawn concerning the strength of those elements of that society's infrastructure which not only adds significant material value but can also add atheistic value. Allowing students the opportunity to create something that can last a long time can help them understand the idea of permanency. A stepping stone such as this one can also be an extension of a science class where students could study the properties of different elements and how those elements interact.

Wednesday, April 27, 2011

Project # 11 Print It!

The inspiration to do Easter eggs for this project came from a children's book entitled The Easter Egg Farm. History about printmaking was also introduced by a PowerPoint. I began by designing a decorated Easter egg on a sheet of drawing paper to be used as a template. I then transferred the image to a foam tray that was the same size as the drawing paper template. I transferred the image to the foam tray by tracing its features with various types of carving sticks. This step represented the engraving and/or etching that is done on metal plates in traditional printmaking. I was cautioned to be careful that if I wanted any written letters on my

egg to do them backwards on the foam tray so they could be read correctly on the print. I also had to keep in mind to make the recessed lines/designs fairly deep being careful not to put a hole in the tray. This would result in a more defined print. I then covered my foam tray with ink with a roller that had been rolled in ink in a separate tray. I tried to make sure that the ink was evenly applied to the foam tray. Next, I firmly and evenly pressed a sheet of paper onto my ink-covered foam tray. I did the "corner test" (lifting one corner at a time to check for even distribution of the ink) to assure that the print was completed. After washing the ink from my carved foam tray, I repeated the process with 3 other colors of ink. I placed my prints on a drying rack to dry overnight. The next day I trimmed the excess paper from my prints and mounted them onto a large sheet of construction paper.


I could use this ink print project as an extension project in social studies when my class is studying the history of print. This would fit nicely as we learn about the first printing presses and the amount of labor involved in the initial printing processes. This would also work nicely to introduce a compare and contrast writing assignment on the development of printed materials.

Project # 10 Abstract Shapes with Scratch Art

In this project, I learned some basics about scratch art. As the project was introduced, I became familiar with the vocabulary terms hatching, cross hatching, stippling, pointillism, and contour lines and how these individual technniques allowed me to create different effects in a scraatch art image. I was encouraged to practice these techniques on a small strip of scratch art paper. Scratch art paper appears totally black but by using a pointed wooden scratch stick the black can be "scratched" away allowing for the background color(s) to show. I used the abstract shape given to me to create an image of a fish. We were cautioned not to touch the black paper as the oily residue from our fingertips might inhibit the scratching and not allow the color to show. I used various contour lines to illustrate the shape of the fins, scales and movement of the water as the fish swims. To finish the project, I framed the image on a precut piece of construction paper.


As an extension project, I would have students scratch out images of nocturnal animals. The students could first practice their scratch techniques allowing for them to experience success in representing their choice in animals. The blackness of the paper would easily represent the nighttime effect. An art project such as this could be incorporated into a science lesson in which students were studying nocturnal animals, their environments, and their habits.

Thursday, April 14, 2011

Project # 9 Pop Art Andy Warhol Style

Display The display reflects characteristics of style used to display Andy Warhol's art. His art is commonly displayed in a grid-type fashion. Bright colors as well as a significant amount of black are commonly used. We grouped the sketches in groups of four to emphasize the theme of one object done in several different color schemes which is another trait displayed in Warhol's art.
Lesson Summary

My partner, Amanda, and I chose to do our lesson in oil pastels partially because we had previous experience with oil pastels when we were children and because we found Andy Warhol's style of art interesting. We found it fairly easy and somewhat relaxing to do our own sketches that we used as models for the class. We felt the lesson went quite smoothly considering we experienced confusion concerning our time allotment. After experimenting on our own, we found that we were able to advise students to do their outlining and name signatures in black shapie as regular markers and crayons would blend too easily with the oil pastels. Another discovery included the fact that the more I "played" with this medium, the more adept at blending I became. It takes a significant amount of time and effort to achieve a higher level of the blending effect. In my opinion, after some practice, third graders would enjoy the high quality of coloreffects characteristic of oil pastels.


This project was designed to have students choose a simple object to sketch. After the sketch is
completed, a student uses oil pastels to add the color to the sketch. Students were encouraged to use color schemes and designs similar to those used by artist Andy Warhol who used everyday objects and images of famous people for his work. Each sketch would feature a color scheme such as warm, cool, monochromatic, analogous, neutral, etc. Oil pastels lend thmselves very easily to blending, the mixing of two colors to create another color or shade of that color. In this project students are encouraged to experiment with blending.


This project could be used as an extension project when studying artists who used blending and/or oil pastels in their work. This project also might work well as an extension project when studying environment, atmosphere, or light in science because it could be used to accurately reflect a sunrise or sunset by using the blending qualities of color pastels.


Project # 8 Rainbow Fish Collage


This project was designed to introduce second grade students to the colors of the color wheel while encouraging creativity and awareness of feelings or emotions similar to those promoted in Marcus Pfister's book The Rainbow Fish. Students are asked to sketch a fish by whatever technique they know and are comfortable with. Students then rip small pieces of construction paper of chosen colors either primary and/or secondary colors. The small ripped colored pieces of construction paper are then glued to the sketch of the fish allowing no white to show for the collage effect. Sequins, buttons, glitter, foil, or beads can be added to enhance the appearance.


This can serve as an extension project when studying underwater life like a chapter or unit on water or oceans. A project like this may also be used to promote self esteem and uniqueness as encouraged in the book The Rainbow Fish. As part of creating the art project, a student could produce a written assignment on various topics dealing with emotions, friends, self-worth, etc.

Sunday, April 3, 2011

Project #7 Pebble Painting

This project was designed as a fun way to introduce second graders to primary and secondary colors. To begin, students lined shoe boxes with a white piece of construction paper. Next students chose one of three sized pebbles and one of three primary paint colors. The pebble was dropped in the chosen color and a spoon was used to take out the pebble along with a small abount of paint placing it on a corner of the paper in the shoe box. After the lid was placed on the shoe box, the students shook the box as little or as much as they wanted as the pebble left unique markings on the paper inside the box. This process was repeated with the other 2 primary colors. To make a secondary color, the process was repeated with the exception of adding another spot of primary-colored spot of paint for a total of 2 spots. The pebble then moved through both primary colors making a secondary color as the box was shook. Students then made a stencil of basic shapes from construction paper and used the stencils to cut shapes from the dry painted papers. Finally the shapes featuring the pebble painting were glued to a large sheet of construction paper. I would use this project as an extension activity possibly after a fall class walk outdoors in which students could collect pebbles along with multicolored fall leaves. We could then use the pebbles along with the primary colors to create various "fall colored" leaf shapes that could be used as a
backdrop for a fall bulletin board.

Project #6 Paper Weaving

This project was designed to introduce fourth grade students to the concepts of weaving and three-dimensional design. Cool or warm color schemes along with tinting and shading allowed students to add uniqueness. Students started with a rectangular piece of cardboard to which 6-8 strips of newspaper were taped (four vertically and four horizontally). Then the paper strips were woven over under, over under. When all strips were woven, each strip was individually twisted to degree desired. After twisting, the free end of each strip was taped to the back of the board. Students then chose a color scheme and proceeded to paint, painting the background before painting the individual strips with a wide brush. Glitter, beads, buttons, etc. were added as optional accents.

I could use this project in a classroom where children may have been studying various styles of weaving and/or items produced by weaving. Because this project promotes uniqueness and style, a parallel could be drawn in that various cultures have unique styles of weaving and each culture's value of the products produced by various forms of weaving depends on various reasons.

Saturday, March 26, 2011

Project # 5 Hidden Safari


In this project, I experienced a new way of drawing, upside down, along with a unique way of using cool and warm colors. I began by practicing small parts of sketches of various objects. I then chose a large "safari" animal, an elephant, to sketch. I turned my visual example upside down. Using contour lines, I drew the elephant on my blank sheet of paper using a cool colored, light blue, drawing pencil. I think that drawing it upside down helped me focus more closely on the lines I needed to replicate. In the next step, I used the warm colors red, orange, and yellow to make patterns which would "hide" my elephant. I learned that layeriing various geometric patterns worked best to "hide" my elephant. Using the "magic ruby red glasses" I had made earlier from red cellophane paper and red construction paper, I could actually see the elephant that I had drawn hidden behind the warm colored camouflage.

I could make a project like this an extension project for almost any elementary age student. I would have the subject to be drawn related to the topic currently being studied; for example, for lower elementary we could craw a leaf to hide if we were studying trees or a fish if we were involved in a thematic unit featuring the ocean. It would also be fairly easy to adapt this project to older students who draw with more detail. Again, this project could be incorporated into almost any unit of study.


Tuesday, March 15, 2011

Project #4 Collage Illustration

In this project, I created an illustration in the style of Eric Carle who uses painting, cutting, and gluing in collage making. I painted sheets of paper using colors and textures that I expected to use to complete my illustration. As the colored sheets of paper dried, I sketched my idea on another sheet of paper. I then cut out patterns and used them to construct the colored pieces of my illustration, layering by pasting appropriate shapes and colors to complete the illustration.

I could make this an extension activity for students in my classroom by first reading a book authored and illustrated by Eric Carle to expose students to his style of illustrating. I would create interest in the illustrations and ask students to try the style of collage making as they would compose their own illustrations for a make believe children’s book. The goal would be not only to help students be aware of different styles of illustrating, but also allow and encourage them to practice the art of collage making. Using supplies of paints, paper, sponges, brushes, etc. students would utilize materials and painting techniques in order to create original material to use in their collages. Students could personalize their creation by making up a 2 page layout of a scene from a children’s story they fabricate or from a story they already know. There would be no “right” or “wrong” way to illustrate so all children would experience a degree of success to further encourage them. Such a project would give them practice in using many different painting techniques as well as practice in cutting and gluing.

Project #3 Fingerpainting


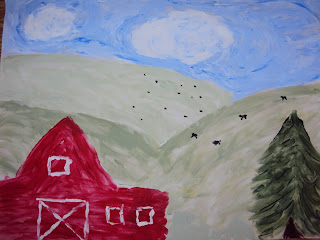
I call my project #3 “Pasture from the Porch.” It is my attempt to paint a landscape using several of Van Gogh’s techniques. Van Gogh’s is known for his vivid colors, use of lines, and presence of emotional impact. His art gained popularity after he died. He did many paintings, drawings and sketches many of which were self portraits and landscapes. In my painting, “Pasture from the Porch,” I used the element of lines, one of Van Gogh’s techniques. I used my fingers to make lines which gave shape to the clouds and the sky in which I used lines to try to represent wind. I also used my fingers to make lines which composed the branches of the pine tree and horizontal lines on the lower part of the barn to represent siding. I also used lines and varied tints to shape the grassy hills behind the barn. I created depth making the black cows on the far hill represented by small black dots while the cows on the hill closer to the viewer are images that are larger than but not as big as they would be if they were next to the barn.

I would use this as an example if I were to have my students do a painting that is done exhibiting some of Van Gogh’s technique(s). We would first spend some time studying Van Gogh, including his techniques and his impact as an artist. Then I would instruct the students that they paint a landscape scene using one of more of Van Gogh’s techniques. They could pretend they are painting a scence viewed from a window in a car or from a house or just a scence from their imagination. I would have them do the painting with their fingers because not only do you get to experience the various paint textures, it’s a unique way to experiment by blending colors and forming lines.

Friday, February 18, 2011

Project # 2 Principles and Elements of Art

In this project, we were to shoot a minimum of 12 digital photographs to explore the elements (lines, shapes, textrue, space, value, color) and the principles (balance, rhythm/movement, contrast, unity/variety, emphasis, pattern/repetition) of art. I enjoyed this project as it took me outdoors and taught me how to look for the elements and principles of art in the world around me.

Value


Value is the lightness or darkness of a hue. I chose this photo because of it is an excellent example of value which is illustrated in the colors of the horizon as the sun rises. An extension activity could begin with talking about the values of color in sunrises and sunsets. I could have each student do an original sunset or sunrise on a large piece of paper. I would instruct my students how to make tints and shades of a particular color and encourage them to use them in their paintings. I could also incorporate a science lesson by explaining why we see certain colors of the spectrum on the horizon as the sun rises and sets but not in the sky when the sun is overhead.


Organic Shape

An organic shape is a shape based on natural objects. I
chose this snow banks photo because the snow banks are so uniquely formed--basically each snowbank form is a one-of-a-kind. An extension project I would do with a photo like this one would be to ask my students what organic shapes they may see as they look out of a window. The window could be one in a building or one in a vehicle. We could talk about the differences in man-made shapes versus nature-made shapes and how to tell the difference. The students could pretend that the shape of their paper is the shape of the window and draw or paint what their mind's eye sees as it looks out of that window. A math lesson on shapes could also be incorporated here. We could look for the geometric figures vs. curved lines both of which are incorporporated in the math standards.


Tuesday, February 1, 2011

Project #1 Footprints

Darcy's Footprints
This project allowed me to use many different mediums to express the "uniqueness" of myself. It allowed me to feel like a "kid" again as I haven't taken the opportunity to complete an art project in years. It was fun to cut out paper dolls and pictures from magazines. I was also able to play with fabric, wood, construction paper, chalk, ribbon, and even grass! If I were to explain this project to another educator I would tell them that I had a great idea on how to get to know your students at the same time that they get to know one another. I would tell them to have their students draw the outline of their foot or feet. Next students could use as many different materials and elements that they wanted to choose with a minimum of three. I would encourage them to make a separate list of things about themselves that they would tell someone who didn't know them. They could then use this list to choose the item and medium to decorate their footprint. Upon completion, each student could take a turn explaining their decorated footprint(s). This activity is a great way to introduce giving a presentation in front of a group. The material is simple and is familiar which elevates the comfort zone for someone new to speaking in front of others. An extension activity that might follow this is to explain the characteristics you chose to put on the footprint on a 1-2 page paper; or, a student could pick one characteristic (a favorite) and write a paragraph about it. Both of these writings could be incorporated as Language Arts lessons.